The year 2026 marks the 25th anniversary of BIONICLE. Because of this, the huge part of the BIONICLE fandom is patiently awaiting for any kind of leaks or rumors that might in any way suggest that LEGO will give us an official announcement of BIONICLE G3 this year. After all, constraction sets are one of the three systems that was defining LEGO since 1999, and since the company killed off those sets with the cancellation of the last wave of CCBS Star Wars sets, people have grown seriously tired with the lack of new parts necessary for building BIONICLE MOCs.
And although the leaks coming to us from people working at LEGO are highly disappointing, there’s hope: several independent sources have reported to me that within the Creative Team there are still BIONICLE enthusiasts who want to pitch the idea of bringing BIONICLE back to their superiors—though for now it seems they are stuck at the stage of developing a build for future sets.
Regardless of the level of advancement of their work, these leaks inspired me to attempt a similar challenge myself: I decided that, based on what was best in G1 and G2, I will develop my own BIONICLE G3 building system, using as few new molds as possible, and for the time being focusing exclusively on canister sets (I do have some ideas regarding the Matoran, but I will draw those another time).
As of today, I would like to share the sketches that I have already drawn. This is the T.A.F.B.S. — the Technic Action Figure Building System.
Let’s start with what the TAFBS system actually is.
It is a BIONICLE figure-building system based on what was best in the old builds and meeting the following assumptions:
-
First, it must be compatible with all legacy BIONICLE parts.
-
Second, it emphasizes the use of a larger number of smaller elements instead of relying—like G2 did—on a set of huge monolithic pieces. This gives much more freedom when building combiners, allowing a buyer of just a few sets to build an impressive MOC without ordering additional pieces.
-
Third, the new elements should offer many build-customization options so that anyone can build their ideal Toa without being limited by the lack of axle or pin connections in key structural places.
-
Fourth, it must offer full articulation, including elbow and knee joints, whose absence has become a real plague in recent years.
-
Fifth, it must visually match other G1 figures.
-
Sixth, the new elements must be versatile and useful enough to find applications in other LEGO themes, allowing the parts to remain in production even if a potential G3 were cancelled prematurely.
-
Seventh, in case LEGO does not bring back BIONICLE as a Technic-based theme, the new elements must be easy to 3D-print. That means ball joints must be separate pieces from the new limbs, since printing a ball compatible with a socket requires high precision and would be troublesome.
-
Finally, eighth, the TAFBS system uses a Toa with specific proportions as its base, where the distance from the tip of the ball-cup to the tip of the ball in each limb segment is: 8 studs for lower legs, 7 studs for thighs and forearms, and 6 studs for upper arms.
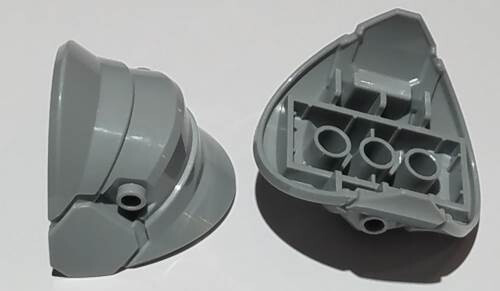
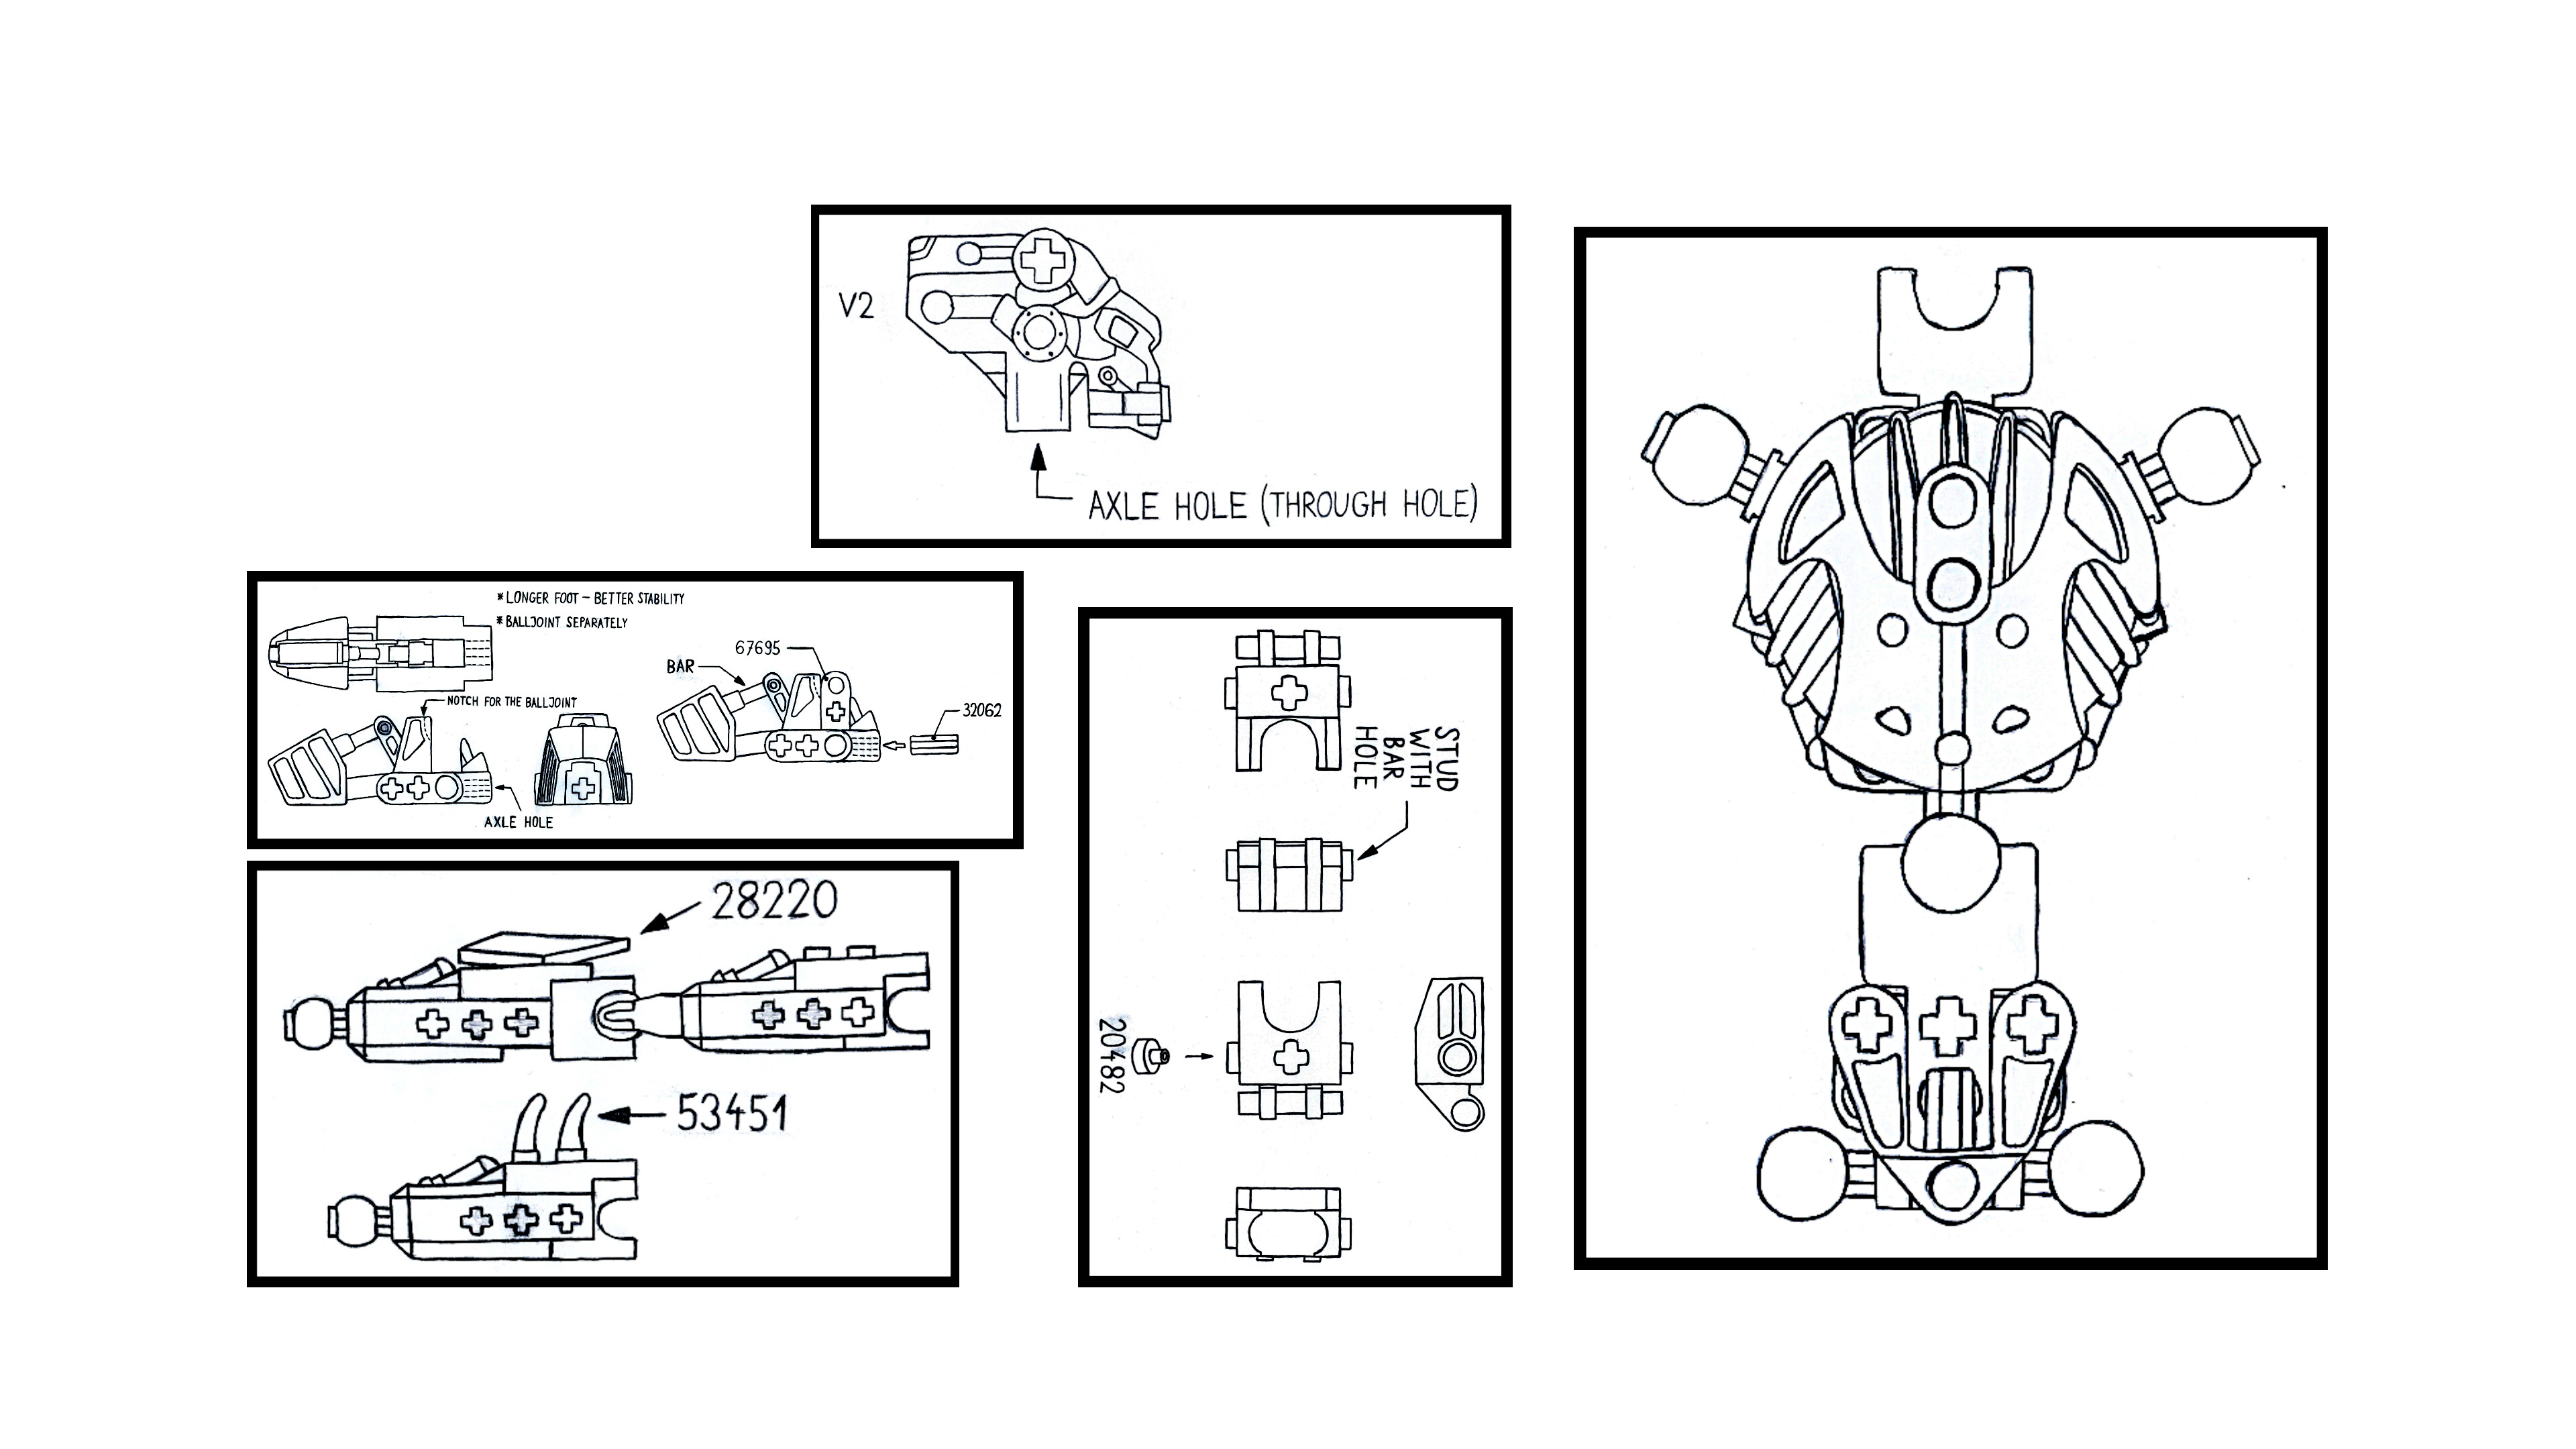
Let’s begin with the head.
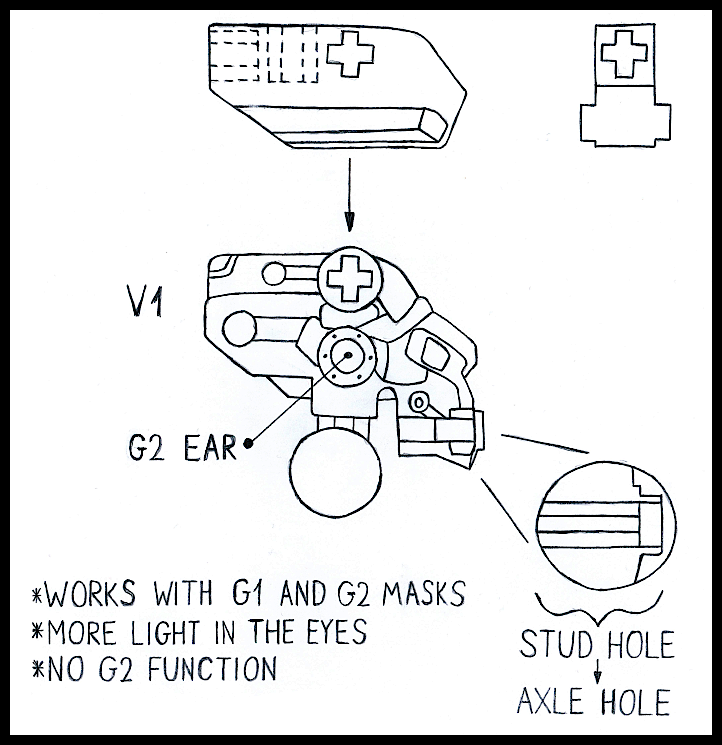
The most important element of every BIONICLE set is the Kanohi mask worn by each figure.
Across both generations, LEGO used three methods of attaching the mask to the head: via a stud, via an axle, and via pegs that snap into the holes on the sides of the head.
And although masks with axle connections were undoubtedly the best solution, the goal for the TAFBS head was compatibility with absolutely every existing mask—even if fans weren’t fond of the 2015 system.
Thus, the TAFBS head has the same “ears” on the sides as the G2 heads, allowing every 2015–2016 mask to be mounted. However, it does not include the irritating mask-ejection feature activated by pressing the transparent “brain.”
The mouth area, on the other hand, is designed similarly to what is so far the best BIONICLE head variant: the Toa Metru head.
In other words, it is a through-axle hole that begins as a stud connection, allowing masks from 2001–2002 to be mounted, as well as all masks made in later years.
Although the sketch does not show it, the mouth is surrounded on four sides by sloped details reminiscent of the shape of the Kini Nui, referencing the mouth area of the Toa Mata head.
What makes this head stand out most is a groove for the “brain” that is twice as deep, allowing more light to pass through, making the figure look more lively, along with a transverse axle hole instead of the pin hole found in Metru and G2 heads. This makes it easy to mount, for example, antlers from the sides without them wobbling.
The “brain" itself has three axle sockets: one transverse for attaching it to the head, one in the back for those who want to add decorative details (as with Kongu Mahri), and one on top, allowing helmets to be mounted and providing an alternative mask-attachment method—something builders experimenting with custom heads will surely appreciate.

The trickiest part to design was the method of connecting the head to the torso.
Originally two options were considered: a neck ending in a ball (G1 style) or a ball socket in the head (G2 style).
The G2 solution severely restricted head articulation because the thick neck collided with shoulder armor.
Thus, the first draft reused the classic G1 approach.
However, after drawing it, a third idea emerged—far better than the previous ones and never used by LEGO—allowing for more customization: a bottom axle hole in the head.
This would also be easier for 3D printing, since creating a compatible ball requires more precision than printing a simple through-axle hole.
This third option is therefore the best, even if it adds two more elements to the figure—something that shouldn’t pose a problem or significantly increase the cost should LEGO adopt the idea.
And even if it did, the benefits are worth the price.
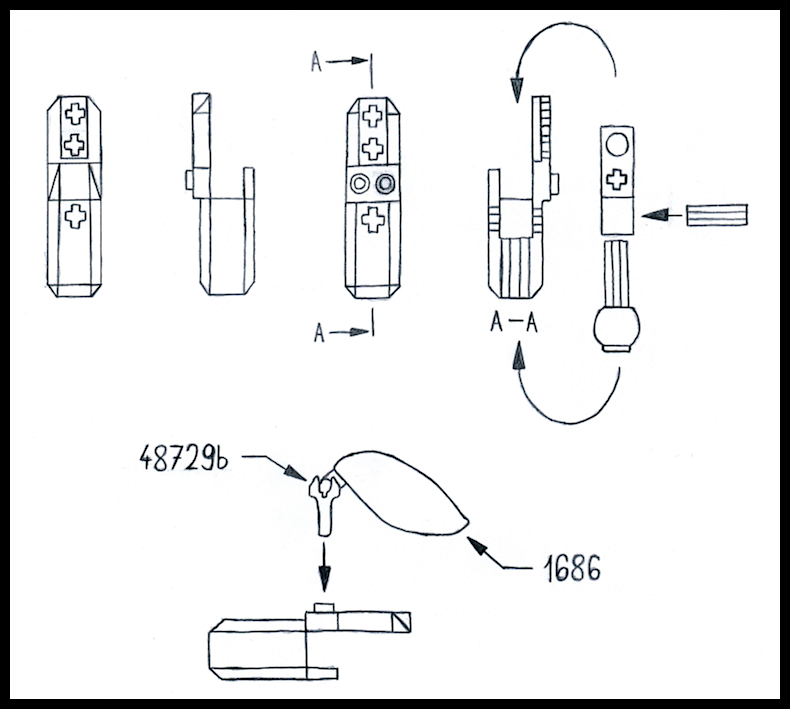
That’s all for the head—now let’s move on to the foundation of the entire construction: the foot design.
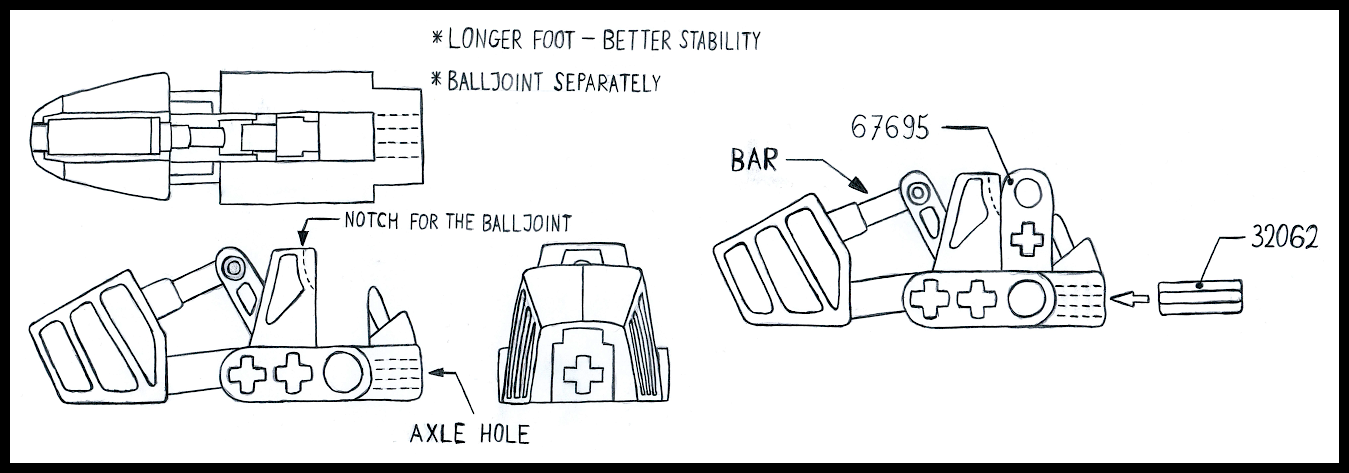
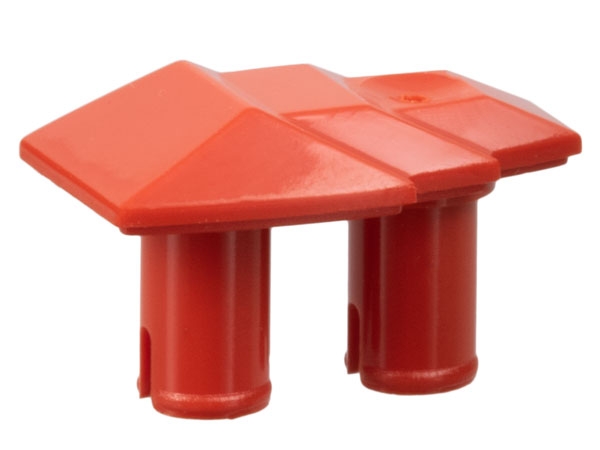
The TAFBS foot is essentially an improved variation of the Toa Mata foot.
Since no later wave introduced a more versatile or useful foot element for MOCs, there was no need to abandon what already worked and visually matched G1 parts.
The TAFBS foot is slightly longer than the Mata foot, ensuring better stability, since Toa built under TAFBS principles are roughly half again as tall as Toa Tahu, for example.
It also differs in the placement of axle and pin holes.
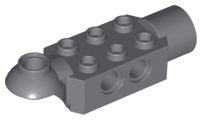
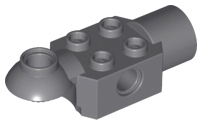
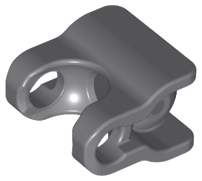
The biggest difference is the lack of an integrated ball socket and an enclosed heel with an axle hole, allowing a separate ball-socket piece to be attached.
And because the socket is a separate element, the foot becomes a versatile piece that can also serve as a base for a torso or a forearm—something custom Rahi builders will love.
Worth noting is the decorative piston with a slightly larger diameter than the original Mata foot—specifically, equal to the diameter of a standard bar—allowing additional decorative attachments, which detail-oriented builders will undoubtedly use.
The sketch shows a note suggesting a cutout in the wall of the connector slot.
This is important because the ankle ball would collide with that wall, preventing proper assembly.
And speaking of assembly—that’s all for the feet, so now we can move on to limb design.
The biggest challenge when building Toa-scale MOCs, especially after all variants of BIONICLE limbs went out of production, is constructing a stable limb with good articulation, one that doesn’t fall apart too easily yet also isn’t overly long.
Reconciling these requirements is nearly impossible, or at least very problematic, with the current LEGO part library.
Therefore, the limbs required the most detailed design work.
Until now, LEGO used two approaches for limb construction:
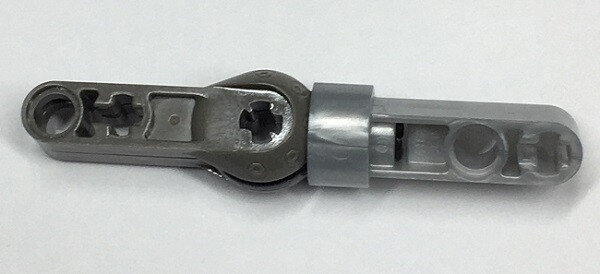
The first used parts with balls or sockets on both ends. These limbs were decorative and didn’t require armor, but they introduced chaos when building more complex combiners and Titans. Many also featured a knee joint with a ball enclosed from the sides, limiting part versatility.
The second approach, CCBS, offered limbs with a ball on one end and a socket on the other. These did not look good on their own and required boring, bulky shells that highlighted the joints in an unaesthetic way. Additionally, each limb had an integrated ball halfway through, limiting how the part could be armored.
Originally, TAFBS planned to introduce a new kind of shell inspired by the Uniters armor, more fitted to the limb shape, with more axle and bar holes, allowing for more customization and slimming down the figure.
But ultimately, every design required replacing existing elements, revealing that CCBS was fundamentally flawed for designing welllooking nonTitan limbs and that its assumptions required a complete overhaul.
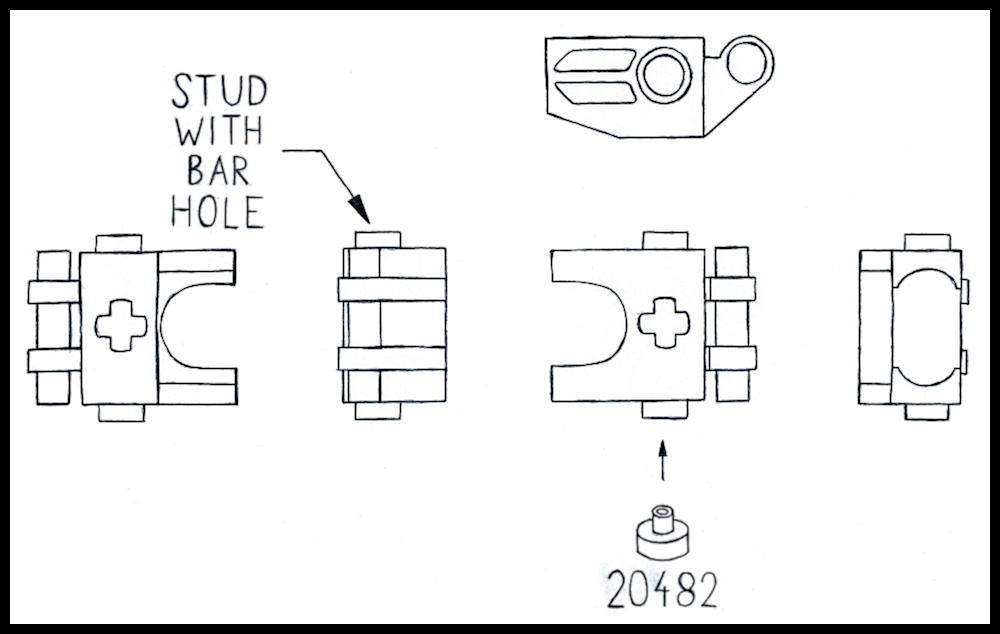
From numerous unsuccessful attempts to fix CCBS, the idea of a shell that doubles as an integral limb component was born.
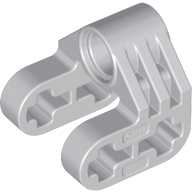
TAFBS shells are much slimmer, only two studs wide, with multiple axle holes around the perimeter for maximum versatility. They look good enough on their own to not require a mass of decorative shells that increase set prices.
One end features a 1.5studdeep axle hole, providing enough friction for the axle to stay in place during posing. This allows a threestud axle with a stop to be inserted and fitted with a ball joint.
For now, that axle exists only in brown, but given its importance in this build, LEGO should really introduce it in black.

The other end of the shell is designed as a receptacle for a standard ball socket connector, or the extended version visible in the sketch, which LEGO should introduce for better structural rigidity. This addition is optional, however, and the shell remains compatible with existing pieces even without it.
The placement of axle holes allows limb length adjustment by mounting the socket deeper or shallower, and the throughaxle hole allows experimenting with different axle lengths for the ball joint.
On the front, two studs with bar holes allow attaching CCBS armor or System elements, introducing more variety between figures and enabling the shell to be used in System MOCs, for example, as a barrel for various launchers, from blasters to flamethrowers to fire extinguishers, or as an exhaust pipe.
To preserve the G1 aesthetic, the shell is decorated with a piston, though this detail is purely aesthetic. It could be replaced with engraved runes, such as those on the TTV canon Mask of Creation, or any other ornament, but G1 fans always loved pistons, so they were the natural choice.
The greatest strength of TAFBS shells is that if LEGO never produces them, they are easy to print on a resin 3D printer since they do not require printing balls or sockets.
Thus, anyone with a 3D printer will be able to bring TAFBS to life with minimal effort.
And since were already talking about ball joints: for the knee joint, which must bend around an axis different from that allowed by a standard ballonaxle piece, the part library should also gain one more element. A ball with side walls, integrated with an axle, as shown in the sketch.
Such a piece would drastically improve MOC building and make life easier for BIONICLE fans.
Although a Toa could be built without it, LEGO should strongly consider introducing it. It would be useful not only in BIONICLE, but also in mechs, dragons, and all kinds of creatures.
Returning to the shells, their only real drawback is that the ball socket can be inserted only one way, which limits use in arms and lower legs.

It would be possible to solve this issue by expanding the TAFBS component library with a slightly modified variation of the element in question, where the only argument against such a solution would be the cost of introducing a new mold.
But making the piece more universal would make it too full of holes and potentially fragile, what is unacceptable for sets meant to be taken apart, mixed, combined, and modified as often as BIONICLE sets, which have always embodied the very idea of LEGO bricks.
Also, a second shell design was necessary: one tailored for slightly shorter limbs, also compatible with most CCBS shell addons, and invaluable for building arms.
The alternate shell follows similar principles but allows the socket to be inserted deeper, shortening the limb enough to keep humanlike proportions relative to the legs and torso.
Its exterior has two studs with bar holes positioned precisely so that the only currently produced shoulder armor piece, despite being arguably the worst shoulder armor LEGO has designed in years, can be mounted despite its short, poorly placed integrated bar.
After several attempts, a design was achieved that accommodates this finicky part while keeping the TAFBS shell versatile and easy to armor with older pieces.
And speaking of arms, we must discuss hands.
Glatorian hands and Hero Factory hands became obsolete with the end of CCBS, leaving us with three options:
To return to classic G1 hands, i.e., standard ball socket connectors, to build System hands from bricks, or… to introduce the mold BIONICLE fans have been asking for for years.
That mold would be a variation of a ball socket connector ending in a bar to which fingers could be attached.
TAFBS envisioned a hand design that would allow weapons to be attached in a way that enables the fingers to wrap around them naturally.
Crucially, the new part had to function as both left and right hand, to avoid having to introduce two molds just because of thumb placement.
Moving on, it’s time to address the torso.
The torso is the heart of every MOC.
In medium sized sets, except for certain Barraki and Glatorian, it was always the most impractical element, as it was hard to use in any way other than the intended one.
This is especially apparent in Toa Mata and Toa Metru torsos.
Only later waves focused on splitting the torso into an upper half and a pelvis, allowing more variation in medium set builds.
This design change began around 2007, but unfortunately cost us the iconic gearbox function as the Inika build replaced it, a controversial change, as some disliked flimsy arms while others welcomed the added stability.
Nonetheless, among those building their own interpretations of canon Toa, the Toa Metru build always dominated.
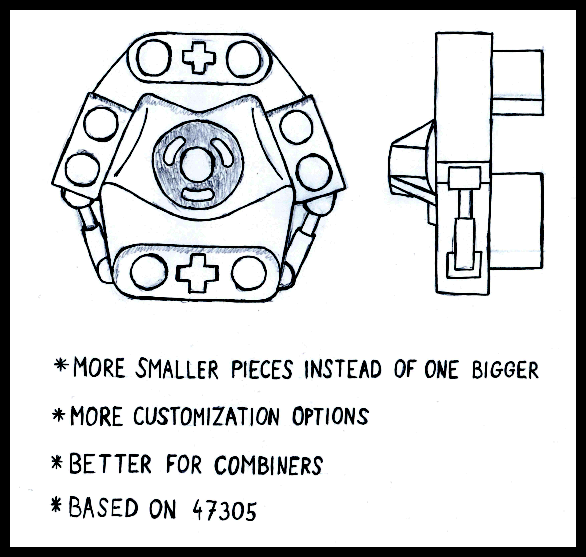
Thus, the Toa Metru were chosen as the inspiration for the TAFBS torso, and the main challenge was to create a torso incorporating the arm swinging mechanism while allowing it to be aesthetically locked in place.
As shown in the sketch, the TAFBS torso is based on the upper half of a Metru torso.
By removing the protruding liftarms with axle holes, used in the original for attaching the pelvis, the TAFBS torso becomes more versatile and can easily function as, for example, a gorillas forelimb, as fans already did it in Toa Bomonga MOC.
By using more small parts throughout the build, this portion of the figure allows far more customization and enables buyers to create more creative combiners.

The first thing you likely noticed is the abundance of pin holes around the perimeter.
This stems from the desire to introduce two improvements to the Metru build:
An additional articulation point allowing the torso to bend at midsection, and the ability for the builder to choose whether the figure has a functional gearbox or fixed shoulders.
Contrary to appearances, designing a new torso does not require introducing a massive number of new elements.
And this number can be reduced even further if the midtorso articulation is removed, since that point alone would require at least two new parts.
But let’s assume we are not limited by budget or LEGO’s policy of minimizing new molds.
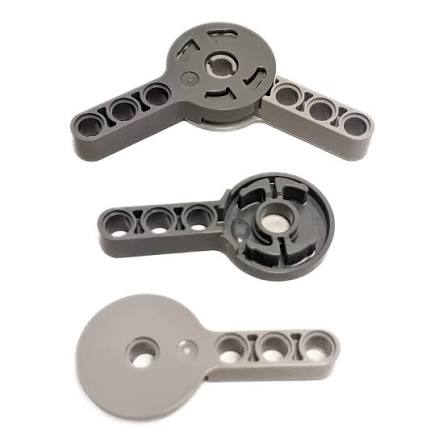
The first new element worth introducing would be a short liftarm with integrated pins, featuring one axle hole and one pin hole.
By inserting it on either side of the gear assembly slot, we could, depending on orientation, choose whether the axles aligned with the gears pass through the pin hole or the axle hole.
In the first configuration, the arm would function exactly as in classic Toa Metru.
In the second, the axle hole would block gear rotation, locking the mechanism, allowing those who dislike the function to disable it by simply inserting one part flipped around.
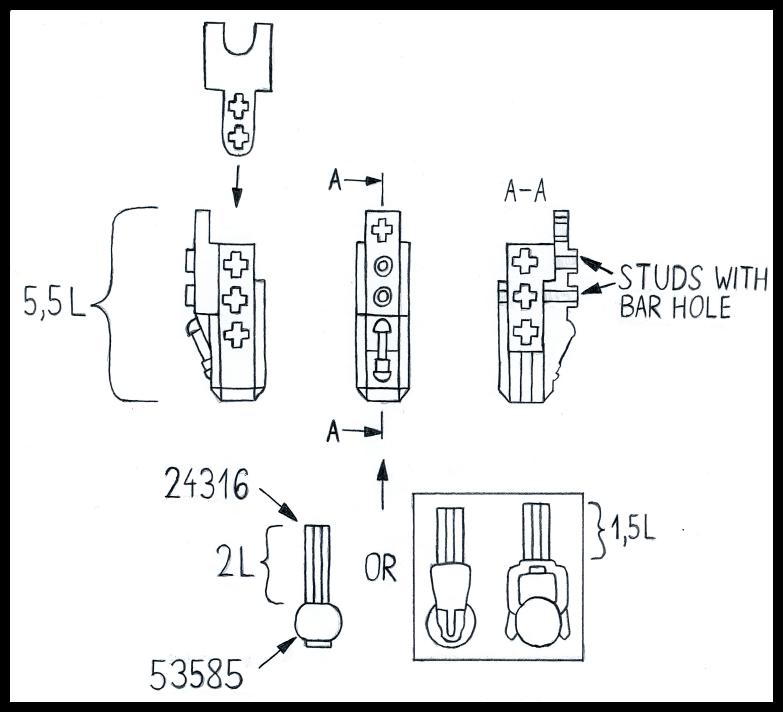
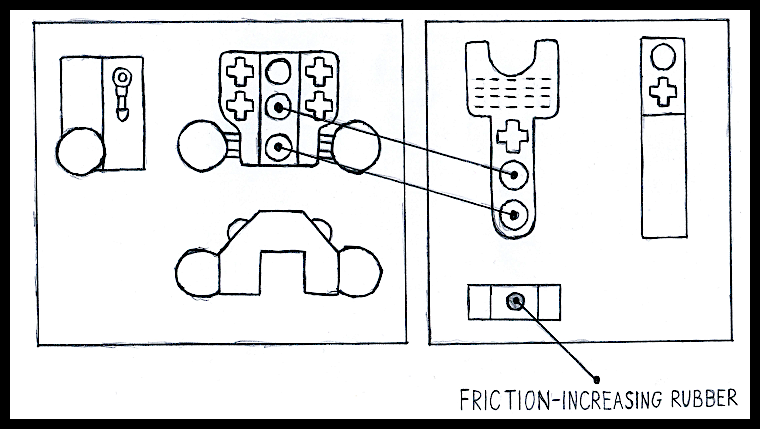
The second element that would greatly simplify MOC building is a threestud liftarm with an integrated ball.
This would allow the torso to gain a ball joint enabling rotation and bending.
To provide greater friction in that joint, a new variant of the ball socket with a rubber insert, similar to the specialized extensions used in G2 Toa limbs, would be useful.
In TAFBS, however, this wouldn’t be just an extension: it would be a fully independent, elongated part featuring additional axle and pin holes—an extremely useful piece for building wings, not only in BIONICLE but also in Ninjago dragons and similar sets.
Setting aside parts that would benefit other themes, there is one thing BIONICLE fans desperately need and which absolutely cannot be omitted: new pelvis pieces.
The downside of custom pelvis builds is that it’s hard to design a compact pelvis where the leg balls hold firmly onto an axle.
Thus, the T.A.F.B.S. parts library needed a solid pelvis compatible with both new and old Toa builds.
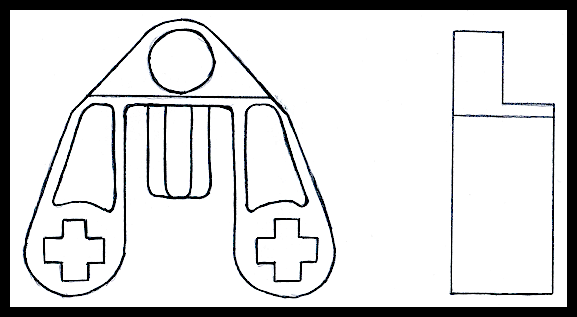
Here, the Vahki pelvis served as the main inspiration.
It was chosen over the Toa Metru pelvis because the latter had a protruding geared section between the balls that often collided with custom legs, and also because the Metru pelvis offered fewer creative uses.
The Vahki pelvis, by contrast, was widely used—for example as the hunched backs of certain Matoran, as a convenient mounting point for wings, and even as a core component of Takadox’s torso.
The T.A.F.B.S. version differs by being more three-dimensional so that when assembled as shown in the sketch, its integrated balls align with the torso’s center plane.
The element in the sketch also features decorative pistons, though these are optional and only aesthetic.
To complete the torso design, LEGO should revive two old parts in slightly updated forms:
the Slizer foot and a Bohrok shield.
The Slizer foot would serve as a pelvic armor piece.
It is one of the most versatile parts ever used in BIONICLE sets, and to this day nearly every large MOC uses it to fill gaps or smooth out angular sections.
The T.A.F.B.S. version introduces two small changes:
First, it should be made of hard plastic rather than the soft, scratch-prone plastic responsible for many BIONICLE parts stored in bins ending up scuffed and damaged.
Second, the sloped sections of the Slizer foot should be flattened to allow it to serve as a Technic connector and function upside-down.
The second change isn’t really important, but harder plastic would be a gamechanger here.

As for the Bohrok shield—given LEGO’s reluctance to fund new molds, it is unlikely that every Toa in a team would receive a custom-molded chest armor shell tied to their element.
Thus, it was important to design a highly universal piece not suggesting any elemental affiliation.
For example, a Tahnok shield would suit a Toa of Fire but not a Toa of Water.
The final design has more pin holes than the original shields, serving two purposes:
They increase friction when turning the gearbox knob thanks to a pin inserted into a pin hole aligned with the rotation axis, and they allow adding a decorative chest light similar to those seen on the Toa in Legends of Metru Nui.
Of course, the more various shields, the better, but since LEGO during last decade was reluctant to introduce a decent number of new elements for new sets, I believe that having whole team of Toa with same chest armor mold isn’t a bad thing as long as such shield will appear in six various colors. Hevily-detailed shield is always a better choice than overcomplicated prints used in G2, which made G2 chest armors useless for MOCs.
The final assembled torso design looks as follows:
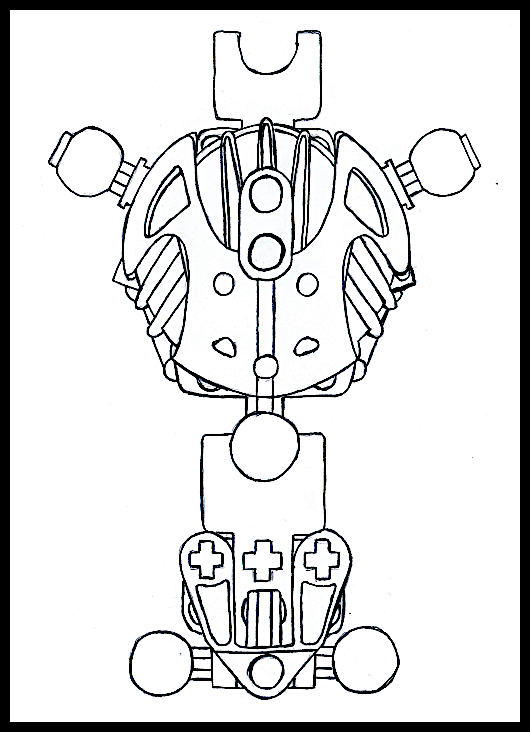
This is, of course, the most minimalist build possible, using as few pieces as necessary, but the number of possible variations is endless.
Since I have no idea about creating 3D models in Blender, my skills at this field are limitet to basic knowledge about using Solidworks, I’m unable for this moment to create .stl files for prototypes of my bricks, T.A.F.B.S. still has to be tested, but if no one more experienced than me attempts to design these parts soon, I will try to at least recreate the shells to build a Toa using limbs built according to the T.A.F.B.S. system.
If you want to see original drafts (I darkened the ones presented in this thread in GIMP to make them clearer), check out my Google Drive:
Also, I’ve made a video about T.A.F.B.S. for my YT channel, but this thread has everything you need to know about T.A.F.B.S. ![]()
~Taohe Netrus~