First things first, I’m aware of the various marbling colourpacks, but that’s not what I’m looking to do.
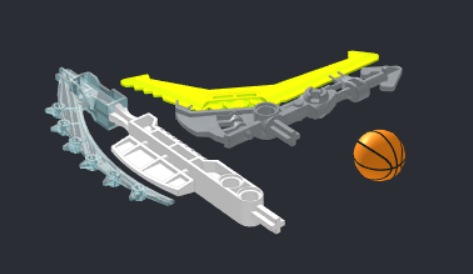
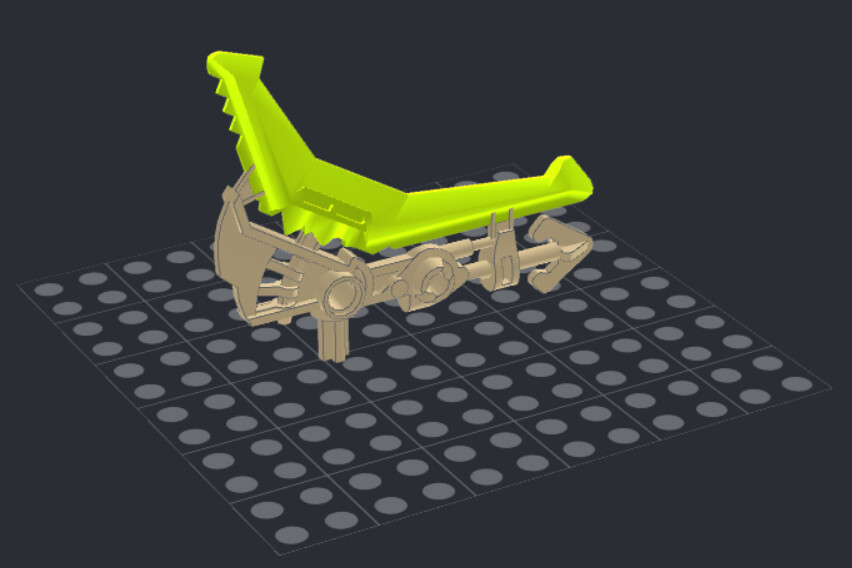
I’ve noticed that some parts in stud.io, both Custom and Master, come with a precoloured section, such as the Hordika tools or Hero Factory 1.0 weapons:
These colours remain even in the PartDesigner tool:
My first guess was that the coloured section was perhaps just a large decal, but stud.io won’t put decals on curved or overly-detailed parts.
How can I save a file with colour such that it will still have colour when I import it into stud.io? Is there a special file type than I am unaware of? I have currently figured out how to save my coloured part as a GLB file, but I can’t figure out how to convert it into a format that stud.io will accept while still maintaining the colour.
Good shout Senit.
Yeah though, the best way is to seperate the part into multiple parts in a 3d modeling program like blender then turn them into connecting parts in parts designer.
The important parts were splitting the part into two objects, and saving them as LDraw parts from stud.io itself, rather than as .obj files in the Part Designer.
Here’s my simplified procedure, for anyone else who has the same question:
Save your part as a 3d object
Split the part into multiple objects as you would like the colours to be split. This can be done in Blender, though I used Solidworks
Whatever part(s) you want to be coloured, import them into stud.io as normal, with PartDesigner
Open the custom part in stud.io and colour it as desired
Export the coloured part from stud.io as an LDraw part. The custom stud.io part can now be deleted, if desired.
In PartDesigner, import the coloured LDraw part, as well as the uncoloured “base”
Arrange the parts so that they line up, and export it all as a new custom part
With this procedure, the uncoloured “base” can still be coloured in stud.io, while whichever parts went through the LDraw procedure will remain their assigned colour.
Over the last 2+ years, I’ve worked out a slightly more efficient way to colour the parts. Instead of exporting a part, colouring it, and putting it back into PartDesigner, there’s a way to export the entire part right from the start and then colour it after.
Split the part into sections and align them in PartDesigner as described above, and export the part. Then, open the .dat file.
There will be many rows of data, each with either a 16 or a 24 in the second column. Each row represents a point in the part, and the second column represents the colour of that point. 16 is the colour code for “CurrentColor”; it just matches whatever colour you assign the part in stud.io. 24 is the colour code for the colour of the edges of the part. To permanently assign a colour to a point, you just need to change the colour code to match the colour code of your desired colour, which can be found in the StudioColorDefinition.txt file.
Of course, there’s no clear way to know what row corresponds to which point, so you’ll have to do a bit of guessing: the rows should be broken up into sections: a big chunk of rows with the colour code 16, followed by a chunk of rows with the colour code 24, and then the pattern repeats. Each pair of chunks (a 16 chunk and a 24 chunk) corresponds to one of the split sections of the part, in the order that you added them to PartDesigner. Just use the Find+Replace feature in your text editor to replace the “16” colour codes of the desired chunk with the code from the colour definition file, then save the .dat file and close it.
Thanks, but I’m horrible with computers so I think I’ll just stick to the first method since I at least know how to do it
Although speaking of which, I ran into a problem where photorealistic rendering won’t work with some of the custom parts I’ve made- you wouldn’t know how to fix this, would you?
Sorry for the delayed reply; would you be able to provide an example? How exactly are they not working?
Yes; in fact, it’s the only “generic” 3d file type that PartDesigner will accept (the only other options being .dat and .ldraw, which are both fairly stud.io-specific file types).
From what I remember, the video was basically the same as the original version of my procedure:
What program are you using to split the pieces? And which version of the procedure are you using?
Assuming that you’re using the original version of the procedure and splitting the parts in PartDesigner, you just export each section into stud.io as its own custom part (or at least the section that you want to colour). Then, once you’ve reimported the coloured section as an LDraw part, just align it with the uncoloured section and export the whole thing as the final part.
That’s fine. In fact, it’s better than using PartDesigner because you can make more precise splits.
In that case, save each part frm Blender as its own .obj file. If you aren’t given an option to save as an .obj directly, you’ll have to save it as a different file type (probably .stl) and then use an online file converter; just search for “stl to obj converter” and there’ll be plenty of options available.
Then, once they’re saved as .obj’s, there’s an “Import” button in PartDesigner. Use this to import the sections and align them with each other.
I’ve never used Blender so I can’t be 100% sure, but virtually any program has some kind of “Save As” option that lets you save as a different file type. Typically, the path is File > Save As.
As I said before, I’ve noticed that not many programs will let you save as an .obj directly, so you may have to save as a different file type and convert it. The may even be a converter that converts Blender files to .obj.
It’s less because I know that Blender is good, and more because I know PartDesigner is bad; the PartDesigner eraser tool is limited to a rectangular prism with approximately a tenth of a stud of spatial resolution. The Intersect and Substract tools allow some flexibility, but you’re still limited to shapes that can be made by overlapping existing parts. Literally any purpose-built 3d model editor allows for better splits.
Plus, even if you’re happy with the splits that PartDesigner lets you make, it has a habit of dropping the resolution of the part and adding random surfaces that can’t be deleted.